Motivation

<이미지 출처: Adafruit.com>
Adafruit의 OLED FeatherWing은 Feather 폼팩터를 사용하는 보드를 위한 OLED display 확장보드 입니다. 사실 저희는 SSD1306 OLED display 사용에 대한 글을 올린 적이 있습니다만, 이번에 Adafruit Feather-M0를 지원 보드에 추가함에 따라 겸사겸사 OLED FeatherWing을 사용해 보기도 했고, Adafruit의 SSD1306 driver 업데이트도 함께 진행하면서 변경된 부분에 대한 설명도 함께 올려봅니다.
OLED FeatherWing
OLED FeatherWing은 기존 OLED breakout에 비해 달라진 점은 크기가 더 작다는 것입니다. 기존 보드는 128×64인데 반해, FeatherWing 버전은 128×32 입니다. Feather의 작은 크기에 맞는 디스플레이를 적용하다보니 이렇게 만들지 않았을까 싶은데요. 우리가 사용하고 있는 Adafruit GFX library의 기본 폰트의 크기를 1로 하면 그 크기가 6×8 px (고정폭)이기 때문에 총 21×4=84글자를 담을 수 있으니 그래도 쓸만하다고 생각됩니다.

(이미지 출처: Adafruit.com)
추가로 OLED FeatherWing은 리셋버튼과 A, B, C 등 총 4개의 버튼을 갖고 있습니다. 리셋버튼은 Feather의 리셋 신호와 다 연결이 되어 있고요. A, B, C는 각각 상단 핀 중 I2C 옆에 위치해있습니다. 모두 active low 입니다. 디스플레이와 함께 버튼이 3개나 있으니 잘 설계만한다면 꽤 괜찮은 UI를 만들 수 있을 것 같네요.
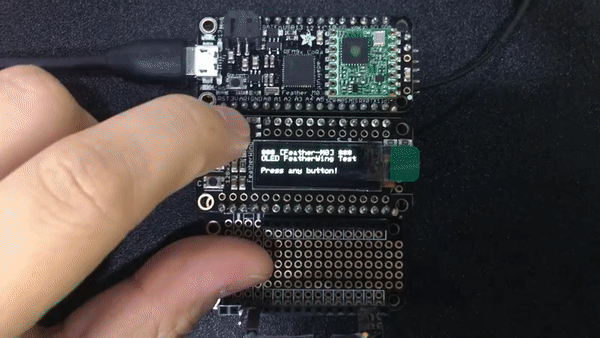
Usage
예제 코드는 다음과 같으며 Github에서도 찾으실 수 있습니다. Feather-M0 에서 이미지 업로드하는 방법은 지난 글에서 찾으실 수 있습니다.
#include <cox.h>
#include <dev/Adafruit_GFX.hpp>
#include <dev/Adafruit_SSD1306.hpp>

Adafruit_SSD1306 display(128, 32, &Wire);

Timer timerHello;

static void taskHello(void *) {
  digitalToggle(D13);
}

void setup() {
  timerHello.onFired(taskHello, nullptr);
  timerHello.startPeriodic(500);

  pinMode(D13, OUTPUT);
  digitalWrite(D13, HIGH);

  display.begin(SSD1306_SWITCHCAPVCC, 0x3C); // Address 0x3C for 128x32
  display.display();
  delay(1000);
  display.clearDisplay();
  display.setTextSize(1);
  display.setTextColor(WHITE);
  display.setCursor(0, 0);
  display.println("*** [Feather-M0] ***");
  display.println("OLED FeatherWing Test");
  display.println();
  display.println("Press any button!");
  display.display();

  pinMode(D5, INPUT_PULLUP);
  attachInterrupt(D5, []() {
    display.fillRect(0, 24, 128, 8, BLACK);
    display.setCursor(0, 24);
    display.print("'C' is pressed!");
    display.display();
  }, FALLING);

  pinMode(D6, INPUT_PULLUP);
  attachInterrupt(D6, []() {
    display.fillRect(0, 24, 128, 8, BLACK);
    display.setCursor(0, 24);
    display.print("'B' is pressed!");
    display.display();
  }, FALLING);

  pinMode(D9, INPUT_PULLUP);
  attachInterrupt(D9, []() {
    display.fillRect(0, 24, 128, 8, BLACK);
    display.setCursor(0, 24);
    display.print("'A' is pressed!");
    display.display();
  }, FALLING);
}
위 코드는 setup() 에서 디스플레이에 스플래시 및 초기 메시지 출력을 하고, OLED FeatherWing의 A, B, C 버튼에 각각 연결되어 있는 D9, D6, D5에 falling edge 인터럽트가 발생할 때 디스플레이에 해당 메시지를 출력하게 하고 있습니다.
기존 SSD1306 라이브러리에서 변경된 부분은 5번째 줄의 display 인스턴스에 대한 Adafruit_SSD1306 class 생성자입니다. 새로운 생성자에서는 디스플레이의 가로, 세로 크기(단위: pixel)와 I2C 또는 SPI 포인터를 받습니다. 20번째 줄의 display.begin() 도 역시 변경되었으므로 참고하세요.